Complied from a STRIPPIT service document written by Doug Hemingway
Machines
Definition of some of the terms used in serial communications:
EIA - The Electronic Industries Association, which publishes standards so that one manufacturer's equipment is compatible with another's.
RS 232 - An EIA standard which defines signal names and levels. This is the most common standard by which low-speed signals are transferred.
Baud - The rate of data transfer in bits per second.
Stop Bit - A bit that is added to the data bits to allow synchronization between transmitter and receiver.
Xon/Xoff - A method of "handshaking" which allows the receiver to control the rate at which data is transmitted. This will be explained more fully later in this document.
CAD/CAM - Computer Aided Design/Computer Aided Manufacturing.
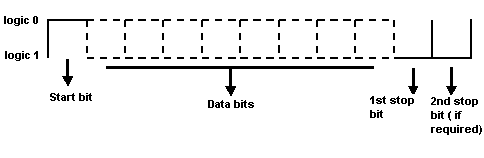
In serial data transmission, the bits that make up the data are sent out on one line, one after another. The transmitter first sends a start bit, which is always logic 0. Then the data bits for the character are sent, with the least significant bit being sent first. If printable ASCII characters are being sent, then each character may be sent as 7 bits. If binary data is being transmitted, then 8 bits are required.
When sending ASCII characters, the sender has the option of sending a parity bit. The purpose of this bit is to make the total number of logic 1 bits in the character an even number. This allows the receiver to check whether a transmission error has occurred.
After the data bits, the transmitter sends one or two stop bits. Stop bits are always logic 1. Most modem equipment requires only 1 stop bit, but many electromechanical devices, such as tape punches or Model 33 Teletypes, do require 2 stop bits.
RS 232 signal levels are bipolar. A high level is defined to be from +5 to +15 V, with +12 V being a commonly used voltage. A low level is defined as -6 to - 16 V. Some equipment manufacturers may try to get away with 0 V for a low level.
The most commonly used connector for RS 232 communications is the DB25 type connector. It has 25 pins, each of which has a defined signal associated with it. Many of the signals are used for very exotic purposes. In our application, we are concerned with only 9 pins out of the 25. Refer to the illustration on page 2. The DB25 connector may have male pins (DB25 P) or female sockets (DB25 S). All of our controls require a DB25 P at the end of the cable, which plugs into the control.
In the following signal description, the local device is the computer, control or other device, which the technician is looking at. The remote device is the computer, control or other device, which is at the far end of the cable from the technician.
Pin I-Safety ground. This pin connects to the frame or chassis of the equipment it is plugged into. This should not be used as a signal ground, nor should pins 1 and 7 be tied together, or noise problems may result. If a shielded cable is used, connect the shield to this pin.
Pin 2-Transmit Data. This pin carries data out of the local device to the remote device. Transmit data is inverted (logic 0 is high, logic 1 is low). The signal output for one character would look like this on an oscilloscope:
Pin 3-Receive Data. This pin carries data from the remote device into the local device.
Pin 4-Ready to Send. This pin is an input to the local device. A high on this pin indicates that the remote device is ready to send data. This pin was meant to be connected to pin 5 of the remote device.
Pin Clear to send. This pin outputs a high to the remote device to indicate that the local device is ready to accept data. This pin was meant to be connected to pin 4 of the remote device.
Pin 6-Data Set Ready. This pin is an input to the local device that indicates that the remote device is on-line and ready for communications. A high on this pin permits communications.
Pin 7-Signal Ground. This is the reference pin for all signals.
Pin 8--Carrier Detect. This pin is an input to the local device. It was originally an output from a modem that indicated that the remote modem had been put on-line. In most applications without a modem in line, this pin is connected to pin 20 of the remote device. A high on this pin permits communications.
Pin 20-Terminal Ready. This signal is also called Data Terminal Ready (DTR). This is an output from the local device that tells the remote device that the local device is on-line and ready to communicate. A high on this pin indicates that communication is possible.
HANDSHAKING
Handshaking is the procedure by which the receiver tells the transmitter that it is ready to accept data. There are two main types of handshaking used:
Hardware handshaking uses the Ready to Send and Clear to Send (pin 4 and 5) signals to stop transmission of data when the receiver requests. For example, if the receiver must transfer data from a buffer to permanent storage (disk or bubble), it will bring its Ready to Send line low. This low is seen at the transmitting device on the Clear to Send line, which causes the transmitter to stop sending data.
In software handshaking, or X-on/ X-off handshaking, the receiver sends signals on the data line to tell the transmitter to stop or start sending data. When the receiver sends the X-off code, the transmitting device should stop sending data. When the receiver sends the X-on code, the transmitter may again send data.
The X-on code is also called DC I (Device Control 1) in many ASCII code charts. X-off is also known as DC3.
Control to Computer or Tape Punch
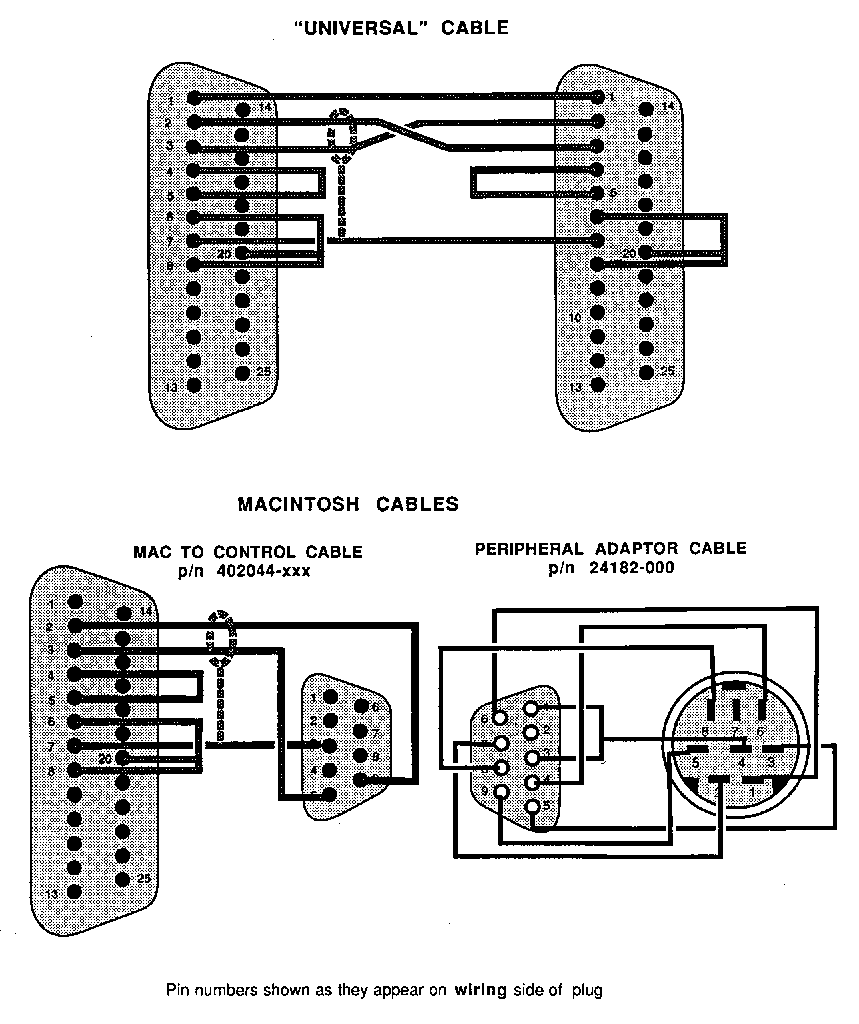
We have found that a single cable configuration has worked in almost all cases when interfacing between our controls and external tape punches or computers which have DB25 connectors. We call this the Universal Cable. A Universal Cable is wired as shown on page 5. Note that the connections in the Universal Cable disable hardware handshaking between the two devices by connecting each device's Clear to Send and Ready to Send signals to itself. The cable also forces each device to believe that the data link is complete by jumpering back the Terminal Ready signal to the Data Set Ready input.
Control to Macintosh
When connecting our control to a Macintosh computer, a different cable must be used, since the Mac serial output comes from an 8 pin mini-DIN connector. Since mini-DIN connectors are hard to find, and even harder to wire, purchase a Macintosh Plus Peripheral Adapter Cable from an Apple dealer or from STRIPPIT. Apple's part number for this cable is MO199. The STRIPPIT part number is 24182-000. The Peripheral Adapter Cable has a DB9 female connector. Another cable must be used to connect the DB9 to the control. A 50-foot version of this cable is available from STRIPPIT as part number 402044-000.
The Macintosh does not use RS 232 signal levels or handshaking signals. Its interface is based on EIA Standard RS 422. An RS 422 device can, however, read RS 232 signals and generate signals that can be read by RS 232 receivers.
RS 422 signals can be sent as far as 4000 feet (1212 meters). If such long distance connections are required, a converter must be used (at the control) to convert the RS 422 signals to RS 232 level signals.
HECC 80/1 software was originally designed to use the RS 232 port as an output only, to interface with a tape punch. The earliest version of the software to contain two-way communications is shown in the chart below. The part number plus the configuration part number must be on the order. If the control does not already contain a DB25 plug for the cable, the customer must also order part number 400958-000, which contains the cable from the CPU board to the DB25 socket.
| MACHINE | CONTROL | PROM PART # EARLIEST WITH RS 232 |
| FC 1000 | HECC80 | 401188-000 REV E |
| FC 1000 | HECC 80/1 | 401188-000 REV I |
| 480111-015 (config) | ||
| FC 1000 | HECC 80/102 | 401314-000 REV A |
| 480611-015 (config) | ||
| FC 1250/xx | HECC 80/28 | 401317-000 REV. B |
| 480421-xxx (config) | ||
| Laser Center | HECC 80/LC | 401316-000 REV C |
| 480111-015 (config) | ||
| FC 750 | HECC 8O/750 | 401189-000 REV K |
| 480251-015 (config) | ||
| FC 750 II | HECC 8O/752 | 401188-000 REV I |
| 480551-015 (config) |
The "(config)" refers to the PROM 15 configuration PROM part number. The part number after the dash may change according to machine options. Check with Tech Support before ordering.
The control uses the Data Set Ready signal from the cable to decide whether to input data from the tape reader or the RS 232 port. If the cable is plugged in, the control automatically looks at the port; if not, It looks at the tape reader. The procedure to input the program is the same.
The HECC 80/1 series of controls has a baud rate switch inside the door on the transition board. Only three lines of the switch are used instead of all four, so only 4 baud rates are possible. They are:
SWITCH POSITION |
BAUDRATE |
0 |
110 |
1 |
300 |
2 |
600 |
3 |
1200 |
In some controls that were not originally built with the Tape Punch Interface option, the switch may not be in place. Jumpers may be soldered to the board to make the connections for the proper baud rate. Contact Tech Support for details.
Most HECC 80/1 controls were shipped with the CPU board jumpered for 20ma-loop operation. This means that the signal levels were NOT RS 232 compatible. Check the CPU board for Jumpers. The chart below shows the jumper configuration for 20ma-loop and RS 232 signals.
RS 232 |
20ma-LOOP |
AB-AA |
AB-AC |
BB-BA |
BB-BC |
CB-CA |
CB-CC |
DB-DC |
DA-DB |
EB-EC |
EA-EB |
The control is expecting data with 7 data bits, 1 stop bit, and even parity. At the end of the program, the control is expecting one of the following end-of-tape indicators:
M02
M30
10 blank characters
If none of these is seen, the control will assume there is more program to be sent, and will remain in program store mode.
In some non-Strippit remote computer systems, the communications program may not transmit the blank characters, called "nulls", even if they were included in the original program. Most computers will output the null code by pressing the control and @ keys at the same time. It may be necessary to press three keys - control, shift, and @ - to output the null character. Remember that the control is looking for 10 of these in a row to end the file transfer.
There are three modes for RS 232 communications in the HECC 80/3xx controls:
Edit
Terminal
Link 5
These are listed in order of ease of interface, from the easiest to the hardest. Whenever possible, use the Edit mode for interfacing to the control.
Common to all modes
The HECC 80/3xx series of controls has a baud rate switch inside the door on the transition board. Baud rates are:
Switch Position |
0 |
1 |
2 |
3 |
4 |
5 |
6 |
7 |
Baud Rate |
50 |
75 |
110 |
134.5 |
150 |
300 |
600 |
1200 |
Switch Position |
8 |
9 |
A |
B |
C |
D |
E |
F |
Baud Rate |
1800 |
2000 |
2400 |
3600 |
4800 |
7200 |
9600 |
19200 |
The control is expecting data with 7 data bits, 1 stop bit, and even parity.
Edit mode
The control uses the Data Set Ready signal from the cable to decide whether to input data from the tape reader or the RS 232 port. If the cable is plugged in, the control automatically looks at the port; if not, it looks at the tape reader. The procedure to input the program is the same. However, Edit mode* can sometimes generate a problem with longer tapes. If the program is longer than the controls receive buffer, the control, will attempt to store the buffer to bubble memory. While doing so, the control will ignore incoming data, so some data will be lost. Running at 300 baud minimizes, but does not eliminate this problem. We recommend that Terminal mode be used.
Older controls do not have terminal mode, and require a software update to install it. Contact Tech Support for more information, as software updates for HECC 80/3XX controls can be a problem, especially when the original software is a very old version.
Terminal mode
Terminal operates in a mode that simulates a dumb terminal, full duplex mode. The remote computer should echo all characters received. All characters typed at the HECC 80 keyboard are sent to the remote computer and all characters received from the computer are displayed on the HECC 80 screen, except when receiving files for storage.
Any lower case characters are converted to upper case. Data is transmitted as seven data bits with even parity. Parity is not checked for received characters. All transmission and reception is done inside the control on an interrupt level, so baud rates up to 9600 are possible.
Older HECC 80/3xx machines did not have Terminal mode built in. To tell if Terminal is available:
Press ETC softkey
Support for software update information.
If COMM label appears next to FAB5, Terminal is available by pressing the
COMM softkey, and then the TERMINAL softkey.
File transfers are accomplished as follows:
1. Remote computer sends 10 nulls in a row to the HECC 80. HECC 80 sends X-off character, enters the file transfer mode, and sends an X-on character.
2. Remote computer sends the filename to be used on the HECC 80. HECC 80 cuts off the filename to 13 characters, if required.
3. Remote computer sends 10 nulls to flag the end of filename and start of file data.
4. HECC 80 sends X-off character and attempts to open a file with the given filename. If a file already exists with that name, the machine operator is given the choice of deleting the existing file and continuing, renaming the incoming file and continuing, or aborting the transfer HECC 80 sends an X-on character.
S. Remote computer sends the file as a continuous data stream. The HECC 80 stores the incoming file in a 16K buffer. If the buffer becomes full, the control sends an X-off character to stop the remote while the control stores the buffer to bubble memory. The control then sends an X-on character.
6. The remote computer sends 10 nulls to flag the end of file.
7. HECC 80 sends X-off, writes the remainder of the file to bubble, and then sends X-on and returns to dumb terminal mode.
Terminal is capable of sending X-on and X-off codes from the keyboard. Pressing <Control>Q (The Control key and Q at the same time) will send X-on. Pressing <Control>S will send X-off
Link 5
Link 5 was designed to work with LINK 80 software in the FAB 5 programming system. It contains a complex error checking protocol that may be helpful in obtaining reliable communications In an extremely noisy environment. However, our experience has shown that it is not necessary in most applications.
LINK 5 also allows the HECC 80 to act as a remote terminal for the FAB 5 tape prep system.
Refer to H.I. Form 2194, Link 80-Link 5 Technical Information, if you need further information about LINK 5 protocol.
The GN6 uses software to access and control the RS 232 port. The control actually has 5 data communications channels. The tape reader is one of them, and the control can get input or output from an ASR 33 Teletype. Any one of the remaining three can be connected to the RS 232 socket.
Parameters on the SET page of the screen display select whether the data input comes from the tape reader or from the external device. Both INPUT DEVICE 1 and INPUT DEVICE 2 must be set to 1 to allow RS 232 communications. Both are set to 0 to allow input from the tape reader.
Parameter 340 selects the input channel and 341 selects the output channel that is connected to the RS 232 socket on the front door. We normally set both of these parameters to 2.
Specifications of baud rate, stop bits, and handshaking are set in parameters 311-313. Parameter 311 applies to our input and output if we have 340 and 341 set to 2.
The description below shows the meaning of each of the bits in parameter 311:
In most cases, you will set Parameter 311 to 0000 + baud rate.
Other parameters that may affect RS 232 communications are:
Alarms
The GN6 uses alarm numbers to communicate problem areas. Alarms associated with RS 232 communications are 085, 086, and 087.
While the control is in the file receive mode, the word EDIT flashes on the CRT screen. DO NOT SHUT THE CONTROL OFF WHILE EDIT IS FLASHING. If you do, the control will display ALARM 101 when it is turned back on, and you must clear the memory and reload parameters to clear the alarm.
The 0P uses software to access and control the RS 232 port. The control actually has 5 data communications channels. The tape reader is one of them, and the control can get input or output from an ASR 33 Teletype. Any one of the remaining three can be connected to the RS 232 socket.
Parameters on the SET page of the screen display select whether the data input comes from the tape reader or from the external device. Both INPUT DEVICE and OUTPUT DEVICE must be set to 2 to allow RS 232 communications through the input/output channel controlled by Parameter 31 1. Both are set to 0 to allow input from the tape reader.
Parameter 340 selects the input channel and 341 selects the output channel that is connected to the RS 232 socket on the front door. We normally set both of these parameters to 2.
Specifications of baud rate, stop bits, and handshaking are set in parameters 311-313. Parameter 311 applies to our input and output if we have 340 and 341 set to 2.
The description below shows the meaning of each of the bits in parameter 311:
Other parameters which may affect RS 232 communications are:
Alarms
The 0P uses alarm numbers to communicate problem areas. Alarms associated with RS 232 communications are 085, 086, and 087.
While the control is in the file receive mode, the word EDIT flashes on the CRT screen. DO NOT SHUT THE CONTROL OFF WHILE EDIT IS FLASHING. If you do, the control will display ALARM 101 when it is turned back on, and you must clear the memory and reload parameters to clear the alarm.
Parameters may be uploaded to the remote computer for easy storage and possible re-installation in the control. This is especially useful for 1000XT installations where the customer has not purchased the tape reader option.
Control to Remote Computer
Remote computer to control